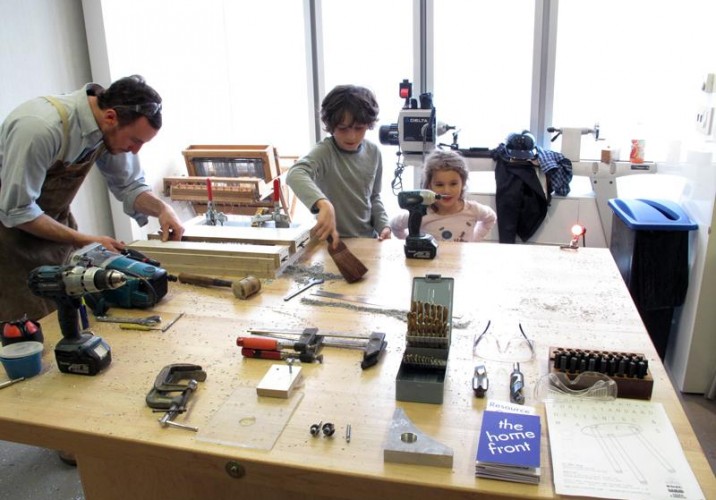
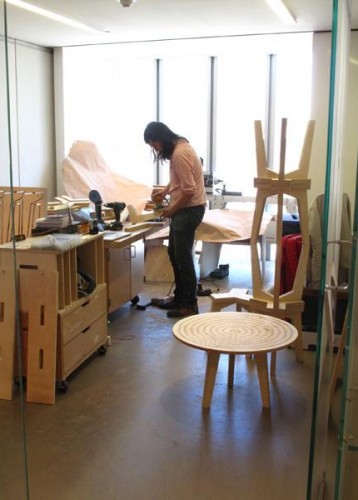
The brief itself was simple: Design and build something to sit on. It was the execution part that was hard. From April 16–21, four sets of young American furniture designers each took a turn in the open studios at New York’s Museum of Arts and Design, each with a single purpose: to build and assemble a chair from start to finish, between the time the museum opened at 9AM to the minute the last straggler was ushered out the door at 6. The designers could use any materials they chose, and they were allowed to make preliminary design studies or prototypes before arriving at the museum, but the bulk of the construction work had to be executed on the museum’s 6th floor — in full view of school tours, visiting tourists, families, and itinerant design geeks who wanted a peek at the action.
But the exercise wasn’t some reality show–like competition to pit designers against each other or to see whose design would reign supreme. The event was part of The Home Front, a museum project curated by Surface editor Dan Rubinstein, who spearheaded the whole thing in order explore in-depth the business of being a designer in America today. And while the four other events in the series consisted mostly of panels or portfolio reviews, this installment focused more on the performative aspects of a designer’s practice (though it, too, culminated in a panel at the museum led by the editors at this website). Typically squirreled away in warehouse studios in Brooklyn, the participating designers were encouraged to put their jigsaws and beloved tool cases and funny design rituals on view for everyone to see — in effect making the whole enterprise transparent as well as engendering a much-needed sense of community spirit.
In light of all that, it makes sense that the designers involved were all members of the American Design Club, an organization founded in 2009 and run by Brooklynite Kiel Mead as a way for young designers to mount exhibitions and share resources, among other things. Mead was charged with selecting the teams who would have their turn at MAD, and his only requirement was appropriately communist in spirit: “It came down to who was heavily involved in the club and who could benefit most from this experience,” he says. “We wanted designers who have truly been helped by and who want to help the American Design Club.” The chosen four were Fort Standard, a new collaboration between Pratt grads Gregory Buntain, a former woodworker, and Ian Collings, a former welder; Silva/Bradshaw, the year-old jewelry and furniture-making studio of Sergio Silva and Mattew Bradshaw; Kai Tsien-Williams, a designer who works mostly on commission for the likes of Project no. 8 and Tom Sachs; and Stanley Ruiz, the Philippines-born, New York–based designer whose modern aesthetic is informed by a fascination with natural found materials. Each of them offered Sight Unseen a closer look at how their day at the museum unfolded.
To see new works by members of the American Design Club, visit their upcoming “Use Me” show, on view beginning May 13 as part of the Noho Design District. For event details, click here.
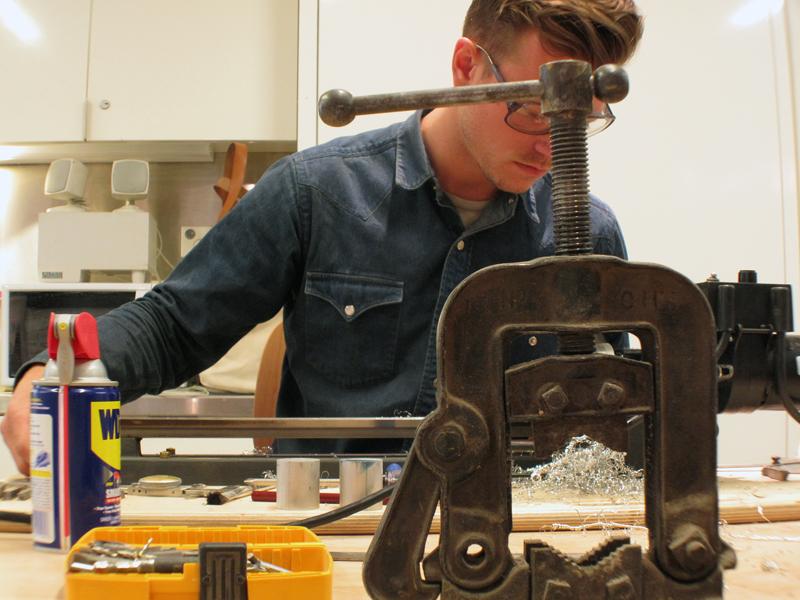
FORT STANDARD: What inspired your MAD chair? “We wanted to make a robust seating element that pushed the limits of our combined skill sets. We also knew that aluminum is one of the few malleable metals that can be worked with woodworking tools — which was not only an interesting design opportunity but a must if we wanted to build a metal stool with the limited set-up at the museum. The design itself evolved with those limitations in mind. Our solution yielded a simple, well-weighted, durable design with subtle details that, as makers, satisfied our sensitivities about how things are made.”
FORT STANDARD: What did you bring with you into the studio? “Tools and materials including a mini-lathe, tap and drill bit (above), pre-made jig, router, letter stamps, and more.”
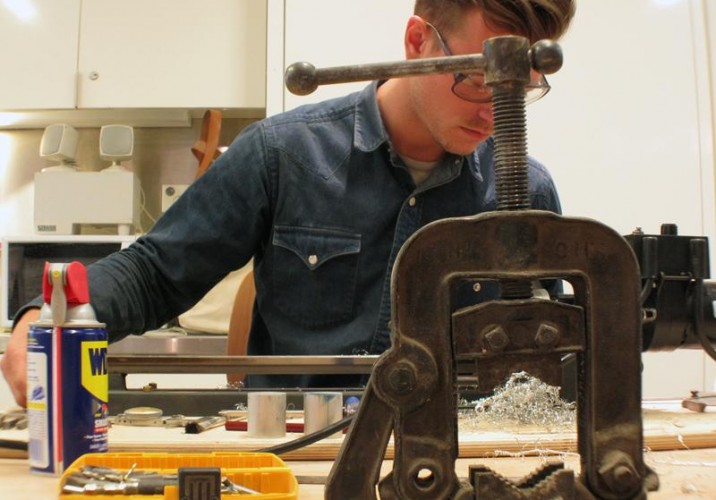
FORT STANDARD:In the upper right is Buntain’s red tool case, labeled with what he calls “a ridiculous amount of information, as it’s one of my most-prized possessions. It contains my grandfather’s Starrett calipers (center), which I used to read the dimensions needed to make the feet on my lathe. He was a machinist, as was my father.”
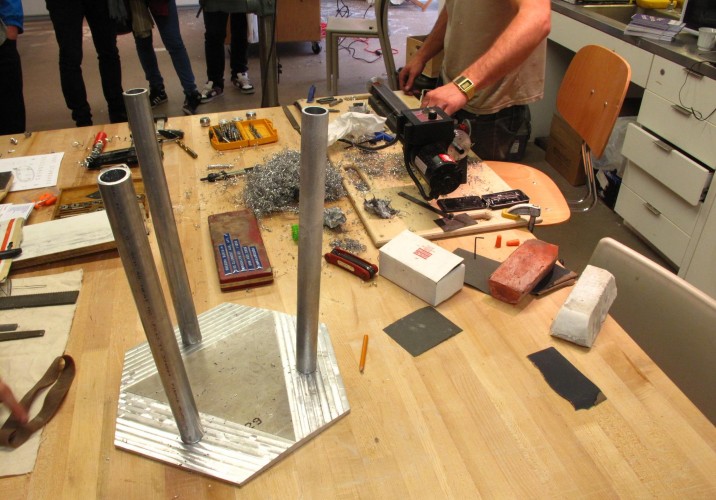
FORT STANDARD: Briefly explain your process. “On a mini-lathe we brought in, I began turning the feet of the stool from solid aluminum blanks I’d cut to size in our shop. I had to remove about 40 percent of the material from each blank in order to properly shape each foot. Each foot had to have two very precise dimensions: the outside diameter of the legs it would be inserted into, and the inside diameter, which had to have a slight taper so it could be pressed — or ‘friction fit’ — into the leg in order to stay without any additional hardware.” Above: Buntain on the lathe, which the studio typically uses to make jewelry.
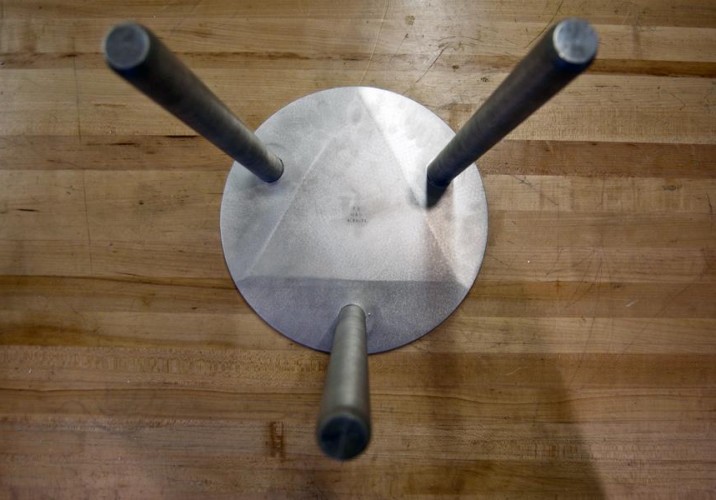
FORT STANDARD: “While I was making the feet, Ian was setting up the aluminum top in a pre-made jig we’d brought with us (above). We’d pre-cut the top of the stool into a hexagon, creating parallel edges with which to accurately orient the top in the jig. We were able to route off a 4-degree angle on three of the six sides of the hexagon, which provided the angles for the legs. We then threaded the holes with a national pipe thread tap, cut and threaded the legs, added a turned foot to each leg, routed the circular top, filed and sanded the top and legs, and screwed the legs into the top.”
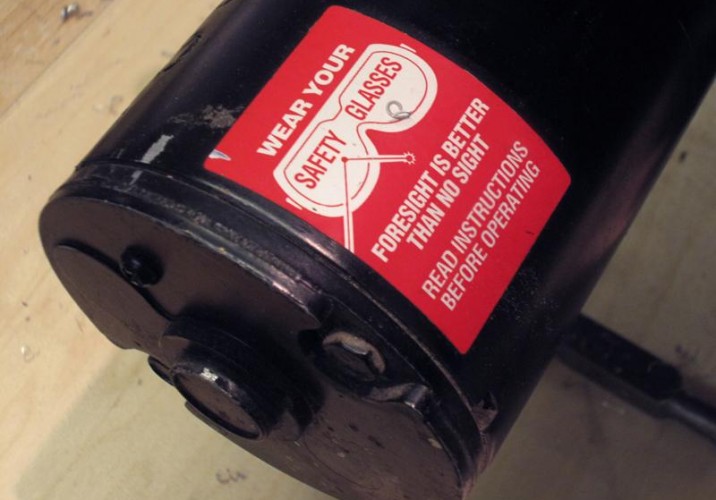
FORT STANDARD: “At the end, the stool was given one last sanding, and we used steel stamps to write: ‘FS / MAD / 4.19.11.’” Above: A safety warning on Buntain’s lathe
FORT STANDARD: Favorite part of the day? “The first time we saw the stool stand up, after we tested screwing the legs into the top when it was still in its hexagonal form. We unscrewed them afterwards to finish the top, but it was a relief knowing we’d reached the point of creating something you could actually sit on. It meant from that point on, we couldn’t totally fail.”
FORT STANDARD: Least favorite part of the day? “The aluminum chips that managed to make their way into our pockets, shoes, and hair.”
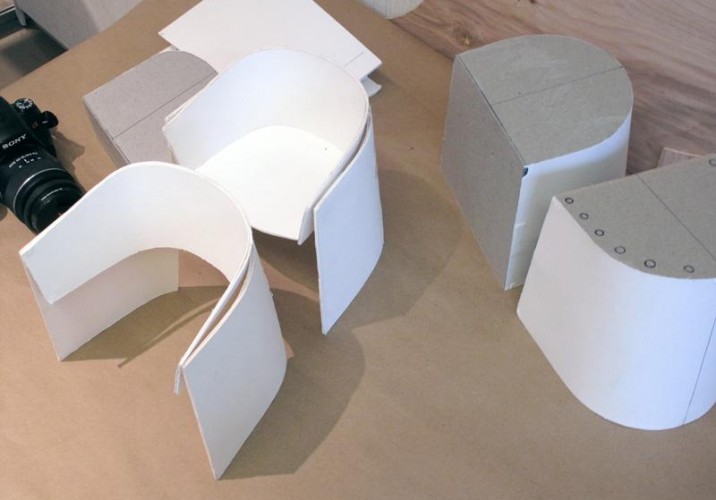
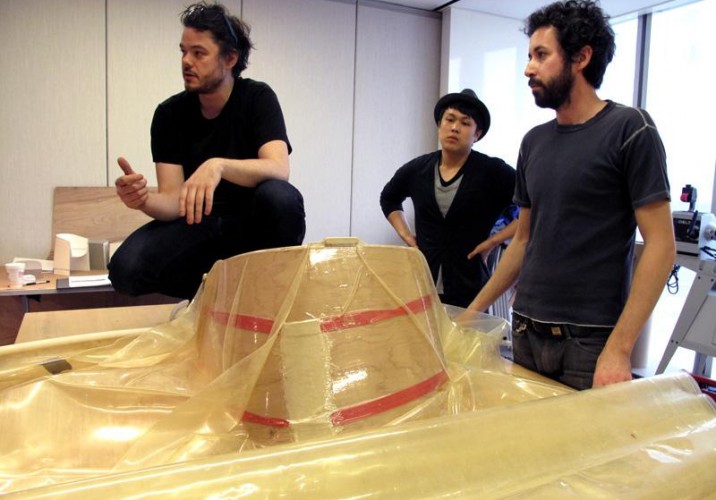
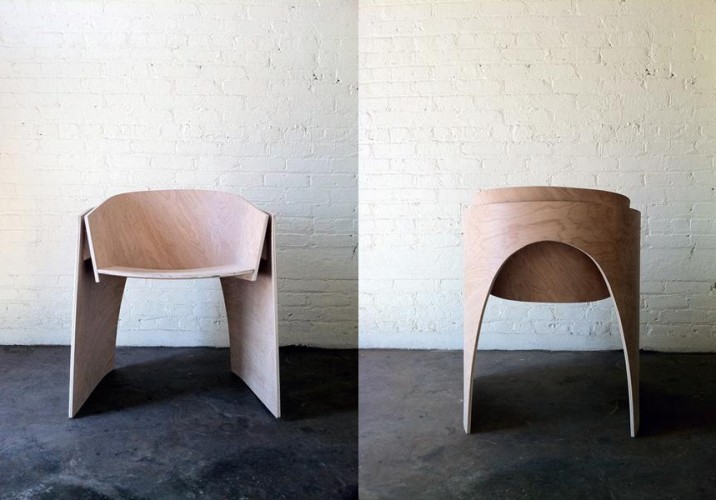
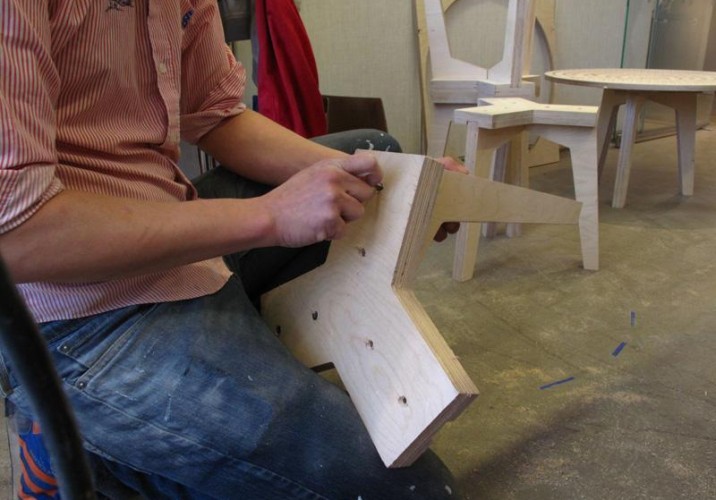
SILVA/BRADSHAW: What inspired your piece for MAD? “We’d seen an origami documentary that profiled this guy who held to the principle that he would bend the paper only once. We tried to make something that adhered to that same principle and came up with a simple sheet bent along a curve, which produced a shape reminiscent of a shirt collar. This led us to create a piece of furniture that had both an inner and outer shell: The inner shell would form the backrest and seat portion of a chair, and the outer shell would form the legs, with the seat itself being the most structural part.” Above: A series of quarter-scale models used to develop the form and construction process of the Collar chair.
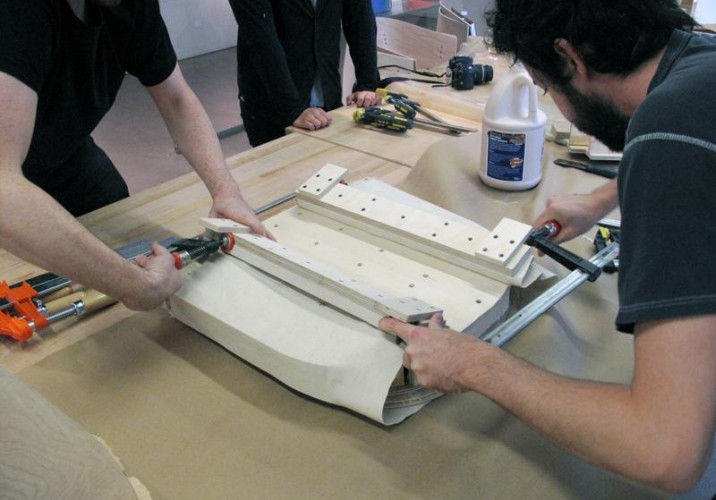
SILVA/BRADSHAW: What did you bring with you into the studio? “A Mylar vacuum bag, a vacuum pump with hose, 20 clamps, three molds over which to form the different wooden components, wood veneering glue, a jig saw, a high torque drill, and beech-veneered luan plywood.” Above: Silva and Bradshaw prepare the mold for the seat component of the chair. “We used a high-tension canvas strap,” says Bradshaw. “Super low-tech, but efficient for molding simple shapes in veneer.”
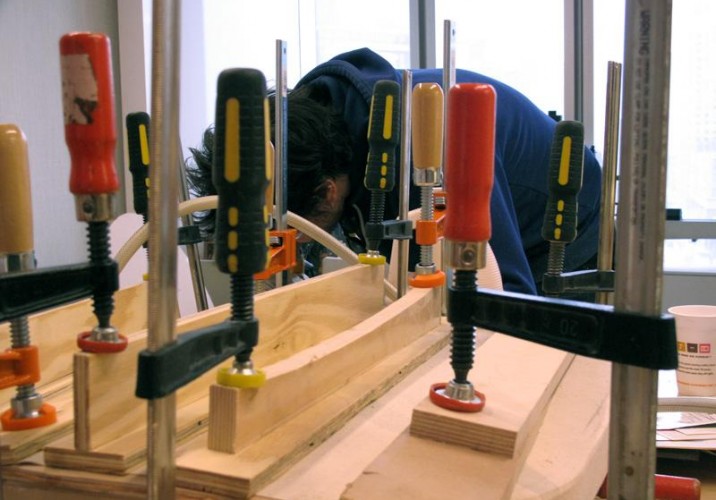
SILVA/BRADSHAW: Briefly explain your process. “First, we cut out flat profiles of wood to laminate against the molds. Then we glued the seat parts and put them into the mold with the canvas strap. The canvas provides the majority of the pressure, but these clamps (above) provided extra localized pressure where needed. Next we glued the wood, put the mold and laminated plywood into the vacuum bag, and quickly sucked out the air. It’s a simple technique that achieves the kind of pressure you would be — forgive the pun here — hard-pressed to do unless you used expensive aluminum molds.”
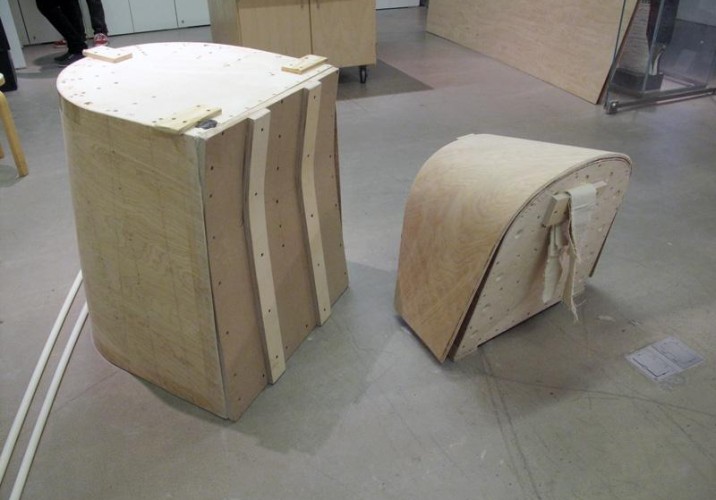
SILVA/BRADSHAW: “While that was drying, we started work on the parts we had molded prior to coming to the museum. We cut the final shapes out by hand using a jigsaw and finessed them with a belt sander. This being only the second prototype, there was a lot of finessing to be done. Everything was off ever so slightly, compounded by the fact that we were literally racing against the clock. But ultimately we walked out with a fully functional prototype that’s probably 80 percent of the way towards a finished product.” Above: Two molds around which they vacuum-formed the wood material. The one on the left is partially collapsed from the enormous pressure created in the vacuum bag.
SILVA/BRADSHAW: Favorite part of the day? “Interacting with the museum visitors. The laminated-veneer process we used is very efficient, materials-wise, but without heat, the glue can take a long time to dry. We wanted to incorporate a little ‘TV magic’ into our day, meaning we planned on engaging with the visitors as much as possible. It was fun seeing the kids’ — and even some of the adults’ — faces light up when you walked them through a process that most of them had probably never seen before.”
SILVA/BRADSHAW: Least favorite part of the day? “Having to transport a studio’s worth of stuff, find parking, build a chair, clean up, and transport the same studio’s worth of stuff back to Brooklyn — all within the same day. Exhausting.”
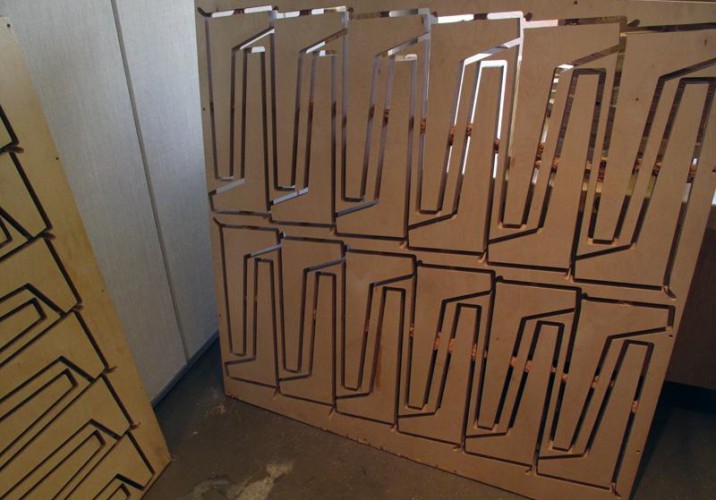
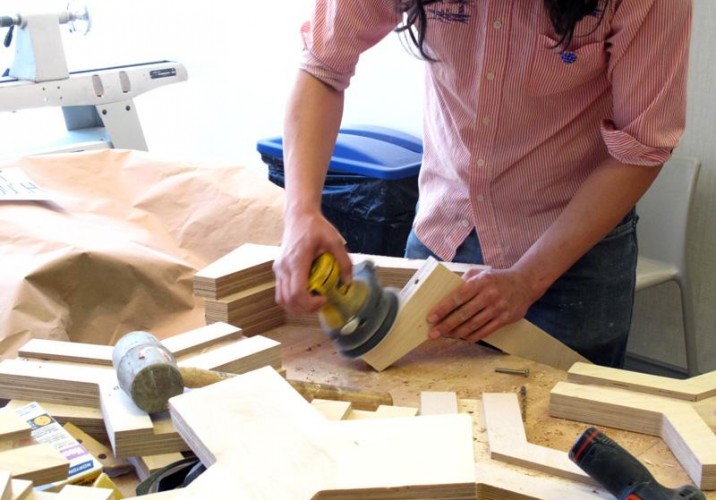
KAI WILLIAMS: What inspired your MAD project? “I wanted to design something that would be easy and cheap to produce with the tools I have. With the design I came up with, I can get about 10 stools per sheet of plywood. The stools are very fast to produce — I ended up making 20 the day of the open studio — and I left them unfinished so as to cut down costs. As you can see in this photo, I came to the studio with a bunch of the legs still in sheet form; I had cut them the night before on my CNC router from half-sheets of 1.5-inch thick baltic birch ply. I pre-cut them for easier transport, but also because they made a pretty pattern to display at the studio.”
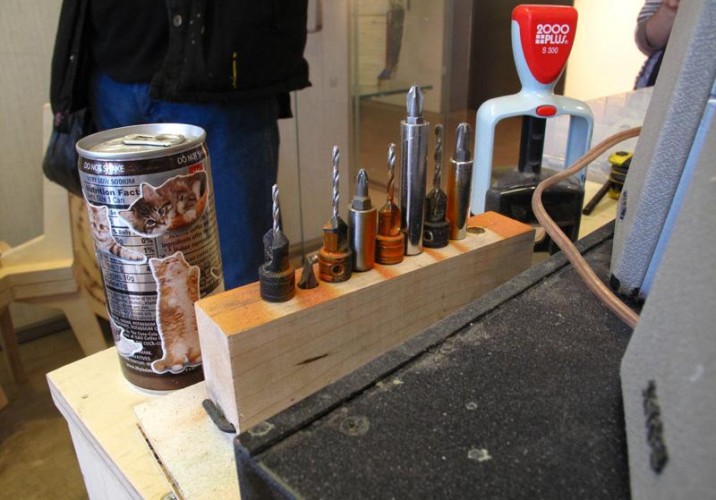
KAI WILLIAMS: What did you bring with you into the studio? “The cat stickers were from my girlfriend; she brought by cat-encrusted water and coffee, both critical to the process. I tried to bring all of the tools that I could even remotely think of needing, and I used most of them. I brought one set of drawers and my tool cabinet — they roll, so that helped a lot, and I screwed them shut for transport. Opening them up in the morning was like Christmas, except sadder because I had wrapped all of my presents myself.”
KAI WILLIAMS: “I also brought a stereo — very useful. A snappy countersink set. Flat head, #1 Phillips, #2 Phillips, and #3 Phillips bits. A stamp for business cards. Plus a grinder with a sanding disk attachment — an invaluable crossover from the metalworking world — a drill, a sander, a hand router, 2 Bosch drivers, a rubber mallet, safety glasses, ear protection, a drafting brush, a combination square, a Japanese handsaw, a dead-blow hammer, vice grips, a tape measure, and assorted screws and sandpaper.”
KAI WILLIAMS: Briefly explain your process. “The first step was to cut out all of the legs with a router. The second step was to drill holes in the appropriate places in the legs and install threaded inserts; I kind of had a jig for this. The third step was to drill and countersink the holes in the stool top. The fourth step was to screw in the stainless bolts that held the legs on. I was sanding everything throughout. The last step was to wood-burn ‘KaiID MAD’ and an edition number onto each stool.”
KAI WILLIAMS: Favorite part of the day? “This really enthusiastic family from Greenport, Long Island, came by and talked to me for awhile. I said they could have this huge 4’x4′ piece of scrap, but I guess the guard upstairs stopped them, because I later spied it in the lobby.” Above: Williams attaching the legs to a stool and screwing in the bolts by hand. “Odd, because I thought I used the drill on all of the pieces,” he says.
KAI WILLIAMS: Least favorite part of the day? “By the end, I had literally built myself into a corner and was working on the floor. When I finally stood up — that was my least favorite part of the day. Ouch.”
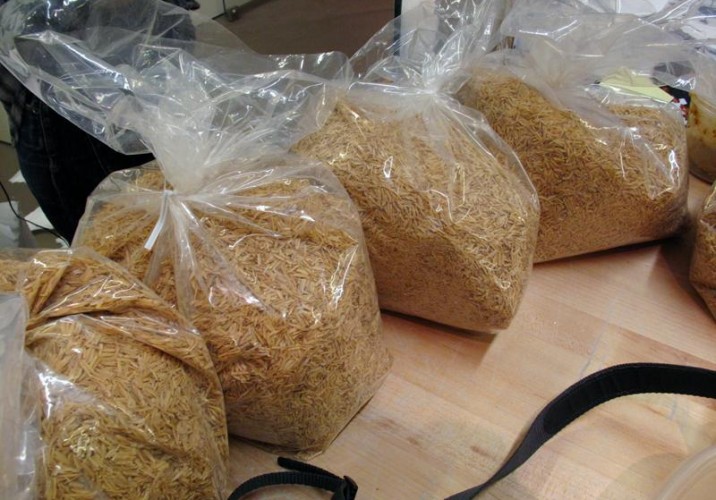
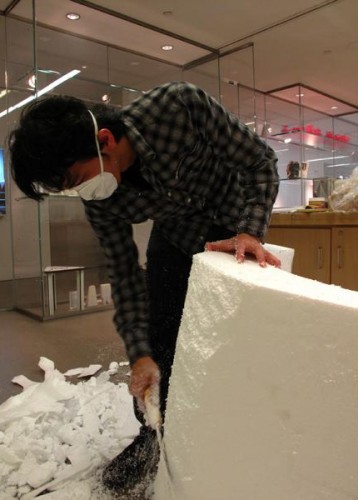
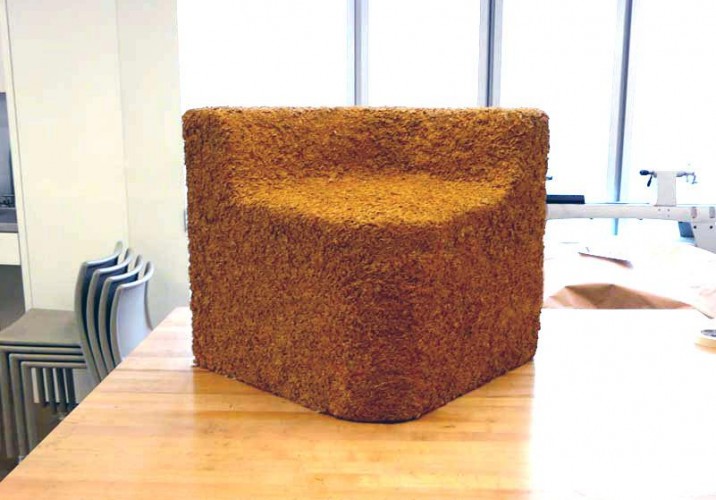
STANLEY RUIZ: What inspired your MAD project? “I wanted to use rice as a part of my design vocabulary since it’s very symbolic of my culture — I grew up in the Philippines — so I made a chair using rice husks and rubber-coated foam. Now that I’m living here in the United States, it allows me to share my outsider perspective, while at the same time assimilating and adapting to the culture here. My fascination with rice as a design material, though, started with another chair I worked on for an exhibition — I made a Panton chair all in white rice.”
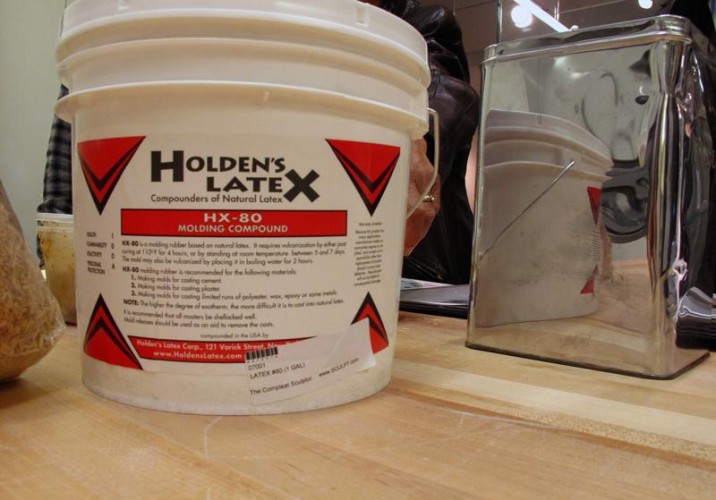
STANLEY RUIZ: What did you bring with you into the studio? “Materials, and a few tools: 8 pounds of rice husks purchased online from a wine and ale supply shop in Indiana (they use it as a filter when brewing beer), a 24-inch block of Styrofoam, a gallon of latex, a hot-wire foam cutter, a mat knife, masking tape, a marker, a mixing bowl, latex gloves (not used), and a mask.”
STANLEY RUIZ: Briefly explain your process. “The day was kind of slow and quiet, which I had anticipated since I knew I wouldn’t be using any loud machines. I only used basic hand tools to carve the foam; the most high-tech thing I used was a $30 hot-wire foam cutter that ended up being too slow to cut and couldn’t reach deep enough. Kiel from the American Design Club rummaged through the shelves and found a hand saw that became instrumental in creating the form.”
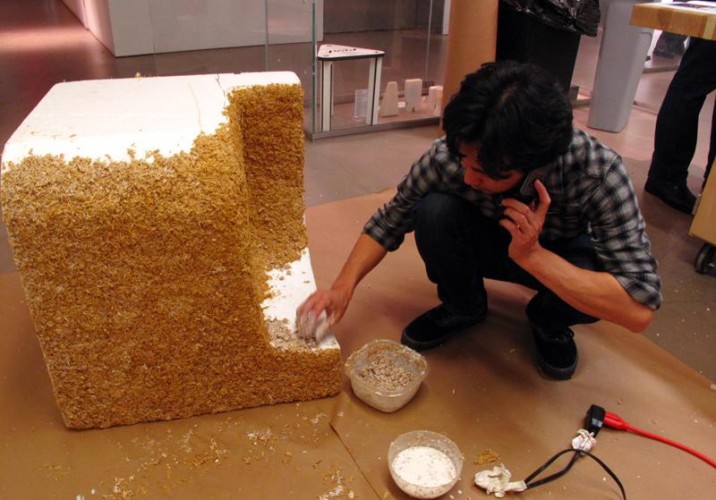
STANLEY RUIZ: “After carving the foam into the desired shape, the process was repetitive and quite meditative. A mixture of rice husks and latex was applied to the foam’s surface — a rubber membrane that doubled as ‘upholstery.’ I was mixing the concoction in small quantities so that it wouldn’t dry too quickly. It was the constant mixing and application that took up the latter part of the day.” Above: “Here I am on the phone with Giulio Cappellini, discussing the possibility of producing the chair,” Ruiz jokes.
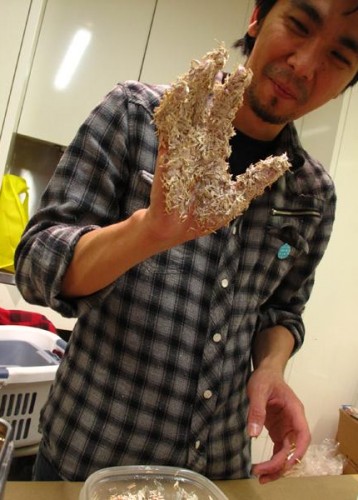
STANLEY RUIZ: Favorite part of the day? “Every time I reached a milestone — like when I finished carving the foam and the form looked okay, or when I finished applying the rice and latex mix to one side of the chair. Satisfaction came in stages. Interacting with the visitors was also a highlight. It was interesting to explain what I was doing; since the process is quite basic, they were able to relate to it somehow. And I liked it when they smelled the latex mix. It’s pretty funky.” Above: Ruiz giving what he calls a “Sasquatch high-five.”
STANLEY RUIZ: Least favorite part of the day? “The most frustrating part was when I moved the piece next door, and a chunk of ‘skin’ came off the side! At that point I had already cleaned up and was ready to go home, but I still had to repair it.” Above: The finished chair. At the panel, Ruiz jokingly called it “a big granola bar,” but he’s since rechristened it Rice Chair (Epidermis Study).
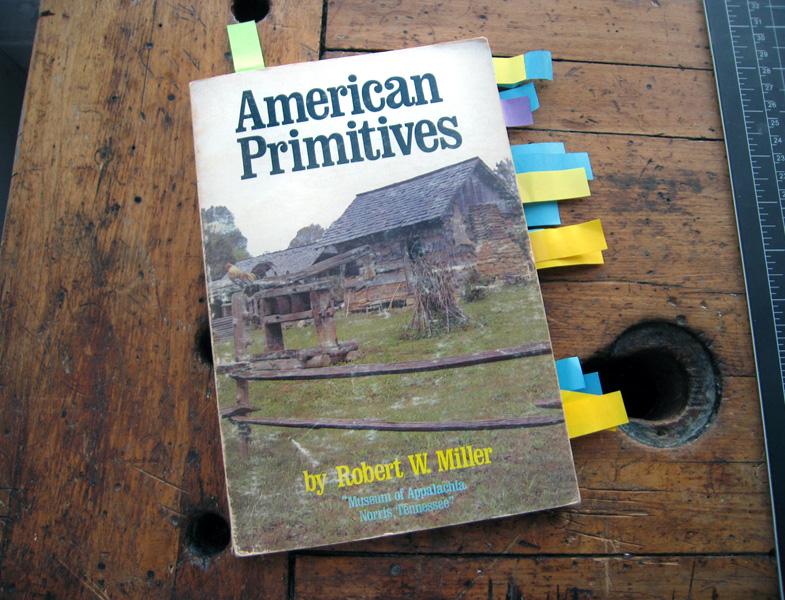
Two hundred years ago, when American pioneers were streaming across the country making homes for themselves in the uncharted wilderness, anyone who needed a corn grater or a mouse trap had to knuckle down and make one. “Everyone was a designer,” says Paul Loebach, who’s long been fascinated by such primitive, purpose-built objects, typically hand-carved in wood or crudely forged in metal. “Whereas Europe had a network of goods trading, for the settlers it was like, we’re limited to these five square acres. They had to be really clever to make the most out of what they had, and that kind of ingenuity is inspiring to me.” Already knowing this about the Brooklyn designer after interviewing him last November, Sight Unseen invited him to choose his favorite objects from the 1972 book American Primitives, which we found at an Ohio flea market for $2 and which contains several dozen annotated selections from Norris, Tennessee’s Museum of Appalachia.
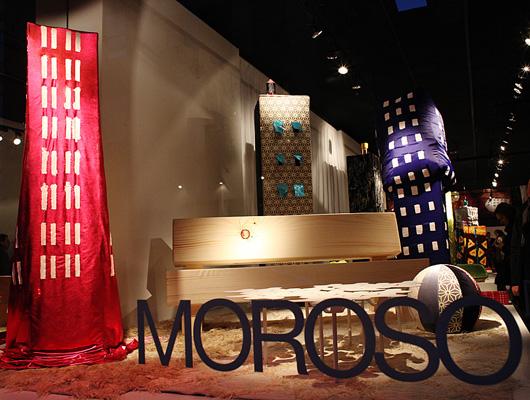
It gyrates, it whirs, and it's every bit the mechanically-powered spectacle of a department-store Christmas Village: Italian furniture brand Moroso's New York showroom has been transformed into a jolly urban landscape of brightly colored kinetic skyscrapers, an immersive installation created by the young Italian artist Anna Galtarossa. Woven amongst the shop's Tord Boontje lounge chairs and Front sofas, Galtarossa's fabric buildings were commissioned by company founder Patrizia Moroso as part of a newly launched grant project called the Moroso Award for Contemporary Art. Curated in partnership with the Civic Gallery of Contemporary Art in Monfalcone — along with a guest panel of design-industry talents like Tobias Rehberger, David Adjaye, and Patricia Urquiola — the award will fund not only Galtarossa's New York project but planned installations by additional 2011 recipients Martino Gamper and Christian Frosi. But even more, it serves Moroso's own effort to expand her support to art, a creative discipline that has lost crucial government funding in recent years, by highlighting its potential to impact the practice of design. We recently spoke with both Moroso and Galtarossa about the ways art and design can influence one another, and how Galtarossa's Skyscraper Nursery embodies those ideas.
If you were familiar only with Uhuru’s work, it would be enough to surmise that the Brooklyn-based furniture designers are experts at creating something beautiful from practically nothing. (The formal term for this, we’re told, is up-cycling.) In the half-decade since RISD grads Jason Horvath and Bill Hilgendorf have been designing their own line, they’ve produced chairs from Kentucky bourbon barrels, loungers from the Ipe wood planks of a demolished Coney Island boardwalk, and scrapwood stools so stylish they were recently picked to decorate the café at New York’s SANAA-designed New Museum. But while it's true Uhuru are a resourceful bunch, step into their sprawling Red Hook studio and any assumptions you might have about their bootstraps process all but disappear.